Time & Attendance Management
Human Resource Managers use Time and Attendance Management to track and monitor employees time record and attendance more accurately. The Human Resource (HR) manager inputs the regular hours that the employees work, the manager indicates any overtime hours and the time allowed between meal breaks.
Time & Attendance Management deals with two main components: the Time Sheet and the Import Time Sheet.
Time Sheet (For an Overview of the Time Sheet application click here)
Time Sheet is a method for recording the amount of a worker's time spent on each job. Timesheets record the start and end time of tasks and durations (i.e. the duration before & after meal breaks). The Time Sheet also contains a detailed breakdown of tasks accomplished throughout the project or program. The information entered in the Time Sheet is generally used for payroll, client billing, and increasingly for project costing, estimation, tracking and management.
Import Time Sheet (For an overview of the Import Time Sheet application click here)
Human Resource Managers use Import Time Sheet to upload mass Time & Attendance data about employees into the database instead of manually entering each employee’s data individually. This proves more efficient in regards to both workload ease and time saving. Import Time sheet can only be uploaded in an XML format.
Time Sheet
Overview
Time Sheet is a method for recording the amount of a worker's time spent on each job. Time sheets record the start and end time of tasks and durations (i.e. the duration before & after meal breaks). The Time Sheet also contains a detailed breakdown of tasks accomplished throughout the project or program. The information entered in the Time Sheet is generally used for payroll, client billing, and increasingly for project costing, estimation, tracking and management
Enter overtime on behalf of an employee:
Go to Human Resources > Employee Management > Time and Attendance Management > Time Sheet
- Click on the New
 icon.
icon. - Enter the Employee code or click on the Lookup
 icon from the Employee field
- Click on the Find
 icon.
icon. - Pick up the Employee number
- Click on the Find
- From the Employee Assignment field, click on the Lookup icon.
- Click on the Find icon.
- Select All from Employee Assignment Filter, then click on the Find icon. Select an assignment.
- Click on the Find
- Select the Fiscal Year: 2018. Some fields will automatically populated from the system.
- Select a pay Period
- At the bottom of the Time Sheet Date
 Tab, click on the New
  icon.
icon. - Enter the Date when the overtime is due.
- Select the Cost item Overtime.
- Complete the mandatory fields.
Example:
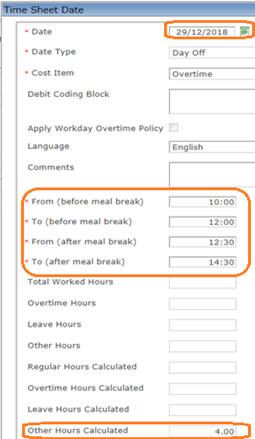
- The system will display automatically the total of hours worked on overtime.
- Click on the Update and Return
 icon.
icon. - Click on Save
 icon. Message confirms that the transition of the workflow has been executed. Click ok.
 - Go to the Transition field at top of the Form, click on Request Approval.
- Click on the Transition
 icon. A new window will appear.

- Click on the Finish
 icon.
icon. - A message will confirm that the Workflow Transition has been Executed.
- Click OK. As soon as the transition is performed, the workflow status will be “Approval Requested”. The request will then be sent to the approver.
- Once the timesheet is approved, the number of hours worked on overtime will sent to payroll to be paid on the selected pay period.
Create A Time Sheet
A Time Sheet records the start and end times of tasks and durations.
To CREATE a Time Sheet, follow the steps below:
Navigation 
By default, you will be in Search Mode.
1. Click on the New icon ![]() . You will then be in Insert Mode.
. You will then be in Insert Mode.
2. Enter the new Time Sheet information. Fields with an asterisk  are mandatory fields.
3. To enter the Employee, if required, click on the Lookup icon  , click on Find icon
  to retrieve the Employee list, then select the Employee. Refer to Employee for more information.
4. To enter the Employee Assignment, if required, click on the Lookup icon , click on Find icon to retrieve the Employee Assignment list, then select the Employee Assignment. Once the Employee Assignment is selected the Shift Schedule of the employee will be displayed. Refer to Employee Assignment for more information.
5. Choose the Fiscal Year, Pay Code and the Pay Period from the drop down menus.
6. Input the Time Sheet Load Date using the calendar 
7. The Time Sheet Source will be displayed as 'Manual' and the Time Attendance Status will be displayed as 'Created'.
8. To view more details about the Created Employee field, click on the details icon  .
.
9. Click on the Save icon  at the bottom to save your new Time Sheet information. A window will appear to confirm the new Time Sheet creation. Click OK to confirm.
Delete A Time Sheet
A Time Sheet records the start and end times of tasks and durations.
To DELETE a Time Sheet, follow the steps below:
Navigation
By default, you will be in Search Mode.
- Find the Time Sheet you want to Delete
- Enter the information to be used as retrieval criteria in the appropriate field(s). If you prefer to see all Time Sheets, leave all fields blank.
- Click Find .
- Select the Time Sheet you want to Delete.
- Click on the Delete icon
 .
. - A window will appear asking you to confirm

- Click OK to confirm and delete the Time Sheet.
- A window will be displayed confirming the Time Sheet has been deleted

To Verify that the Time Sheet has been Deleted:
- Click on the Search icon

- Enter the Time Sheet information in the appropriate field (s).
- Click on the Find icon
- This window will appear

Modify A Time Sheet
A Time Sheet records the start and end times of tasks and durations.
To MODIFY a Time Sheet, follow the steps below:
Navigation
By default, you will be in Search Mode.
- Enter the information to be used as retrieval criteria in the appropriate field (s). If you prefer to see a list of all Time Sheets, leave all fields blank.
- Click on the Find icon
 .
. - Click on the Time Sheet you want to modify.
You will then be in Update/Delete Mode. - Make the necessary modifications. To add or remove an Employee, refer to Employee. To add or remove an Employee Assignment, refer to Employee Assignment.
- Click on the Update icon
 at the bottom of the screen to save your modifications. A window will appear to confirm the modification. Click OK to confirm.

Workflow Transitions for Time Sheets
Time Sheet is a method for recording the amount of a worker's time spent on each job.
Navigation
To REQUEST APPROVAL, APPROVE, or REJECT a Time Sheet, follow the steps below:
By default, you will be in Search Mode.
1. Find the Time Sheet which you would like to make a status change on.
- Enter Code, Description or other Attributes of the Time Sheet
- Click on the Find icon

2. Select the Time Sheet you would like to Request for Approval, Approve, or Reject.
3. Select your choice from the drop down list in the Transition field.

4. A Transition Window will be displayed confirming the Transition. Add a description in the Step Note in the Transition Window.
![]()
5. Click on the Finish Icon  to complete the Transition transaction, or click the Discard Icon
  to abort the transition.
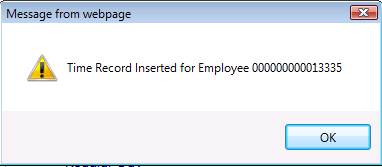
6. Upon clicking the Finish Icon a window will be displayed confirming the Time Sheet Workflow Transition was executed.
![]()
7. Click OK on the Workflow Transition Executed window. The Time Sheet status is now set to whichever choice was selected.
Import Time Sheet
Overview
Human Resource Managers use Import Time Sheet to upload mass Time & Attendance data about employees into the database instead of manually entering each employee’s data individually. This proves more efficient in regards to both workload ease and time saving. Import Time sheet can only be uploaded in an XML format.
Navigation 
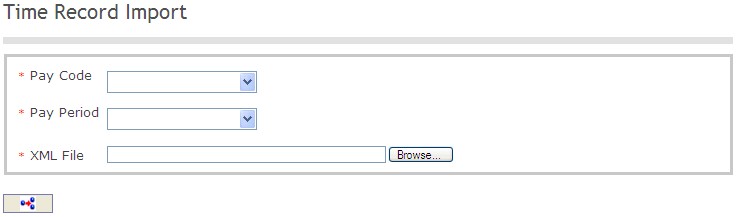
The Import Time Sheet screen includes the following fields:
Field | Definition |
Pay Code | Lists all the different types of pay that have their own unique pay schedule |
Pay Period | Defines Pay Period with a Pay Code |
| XML File | Extensible Markup Language File |
Create Import Time Sheet
The Import Time Sheet screen allows mass upload of an employee's time and attendance data.
To IMPORT a Time Sheet, follow the steps below:
Navigation
1. Select the Pay Code and the Pay Period from the drop down menus.
2. To upload an XML File from your computer click on the  button and find the XML Time Sheet file location on your computer, then click on Open.
3. Click on the Import  button to import the Time Sheet.
Update your personal contact information
Personal contact information is located in the Personal File window on the Self Service application.
Go to Menu > Employee Self Service > Personal Information > Personal File
1. To Add new contact information
a. Click on the New icon. The Contact form will display.
b. Enter the new contact information.
Example:
· IsMain: Put a checkmark in the box;
· Contact Type: Electronic Mail;
· Contact Location Type: Work;
· Contact Value: your email address;
· Description: Work email
c. Click on the Save and Return icon.
d. Click on the Update  icon to save the changes.
2. To Update the personal contact information
Go to Contact  Tab
Tab
a. Click on the hyperlink to display the Contact Form. Make the required changes.
b. Click on the Update and Return icon.
c. Click on the Update icon to save the changes.
3. To Add New Address:
a. Click on the New icon. The Address form will open.
b. Enter the new Address.
c. Check is Main? Leave blank.
d. Click on the Lookup  icon to select the Region.
e. Click on the Find  icon.
icon.
Example:
· Region: North America
· Country: Canada (from the dropdown menu)
· Address Type: Home
· Address: 100 Rue principale;
· Postal Code: 8999
f. Click on the Save and Return icon.
g. Click on the Update icon to save the changes.
4. To Update the Address information:
Go to Address  Tab
Tab
a. Click on the hyperlink to display the Address Form will open.
b. Make the required changes.
Example:
· Address Type: Home;
· Address: 125 pie street.
c. Click on the Update and Return icon.